Test Online REST API using Karma & Jasmine

Today we are going to add test for Online REST API. For that we are using JSONPlaceholder Fake Online REST API.

Let’s start the testing. First of all we are going to write our test for angular.factory called jsonplaceholder.spec.js.

describe('JSON Placeholder API Service', function () {
    var API_ENDPOINT = 'https://jsonplaceholder.typicode.com';

    beforeEach(angular.mock.module('api.jsonplaceholder'));

    beforeEach(inject(function (_JsonPlaceholderApi_, _httpBackend_, _q_){
        JsonPlaceholderApi = _JsonPlaceholderApi_;
        httpBackend = _httpBackend_;
        q = _q_;
    }));

    it(' Should Exists', function (){
        expect(JsonPlaceholderApi).toBeDefined();
    });
});

Now if you run karma start you will see something like that:
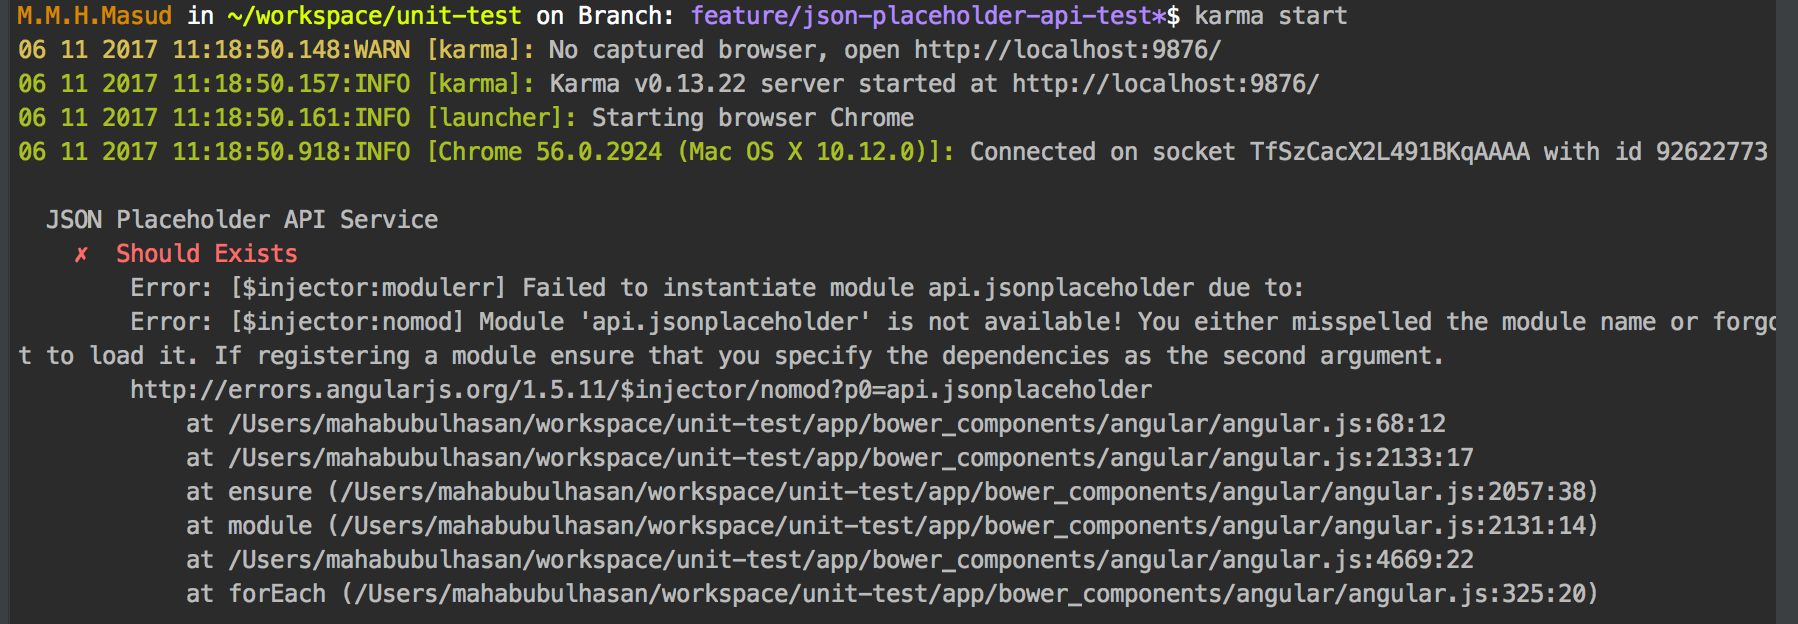
screen-shot-2017-11-06-at-11-19-06-am

which means, we haven’t defined our angular module with factory. Lets defined that:

(function (){
    'use strict';
    angular.module('api.jsonplaceholder', []).factory('JsonPlaceholderApi', jsonPlaceholderApi);
    jsonPlaceholderApi.inject = ['http', 'q'];

    function jsonPlaceholderApi(http, $q) {
        return this;
    };
}());

This time you will see something like that:
screen-shot-2017-11-06-at-11-21-10-am

Now, lets make a GET call to REST API end point /posts. It will return 100 post item as JSON response. On Success, here we will mock the response with a mockObject which length is 3.

describe('JSON Placeholder API Service', function () {
    var API_ENDPOINT = 'https://jsonplaceholder.typicode.com',
        mockResponse = [
            {
                "userId": 1,
                "id": 1,
                "title": "sunt aut facere repellat provident occaecati excepturi",
                "body": "quia et suscipitnsuscipit recusandae consequuntur expedita"
            },
            {
                "userId": 1,
                "id": 2,
                "title": "qui est esse",
                "body": "est rerum tempore vitae\nsequi sint nihil reprehenderit dolor beatae ea "
            },
            {
                "userId": 1,
                "id": 3,
                "title": "ea molestias quasi exercitationem repellat qui ipsa sit aut",
                "body": "et iusto sed quo iure\nvoluptatem occaecati omnis eligendi "
            }];

    beforeEach(angular.mock.module('api.jsonplaceholder'));

    beforeEach(inject(function (_JsonPlaceholderApi_, _httpBackend_, _q_){
        JsonPlaceholderApi = _JsonPlaceholderApi_;
        httpBackend = _httpBackend_;
        q = _q_;
    }));

    it(' Should Exists', function (){
        expect(JsonPlaceholderApi).toBeDefined();
    });

    describe('GET /Post ', function () {
        var result;

        beforeEach(function () {
            result = {};
            spyOn(JsonPlaceholderApi, 'getAll').and.callThrough();
        });

        it('should return All Posts ', function () {
            httpBackend.whenGET(API_ENDPOINT + '/posts')
                                 .respond(200,q.when(mockResponse));

            expect(JsonPlaceholderApi.getAll).not.toHaveBeenCalled();

            JsonPlaceholderApi.getAll().then(function (response) {
                result = response;
            });

            $httpBackend.flush();
            expect(JsonPlaceholderApi.getAll).toHaveBeenCalled();
            expect(result.length).toEqual(3);
            expect(Object.keys(result[0]).length).toEqual(4);
        });

    });
});

Now, if you run your test you will see an error with getAll method is not defined. Let’s define that method:

(function (){
    'use strict';
    angular.module('api.jsonplaceholder', []).factory('JsonPlaceholderApi', jsonPlaceholderApi);
    jsonPlaceholderApi.inject = ['http', 'q'];

    function jsonPlaceholderApi(http, q) {
        var jsonPlaceholderApi = {},
            API_ENDPOINT = 'https://jsonplaceholder.typicode.com';

        jsonPlaceholderApi.getAll = function () {
            returnhttp.get(API_ENDPOINT + '/posts').then(function (res){
                return res.data;
            });
        };
        return jsonPlaceholderApi;
    };
}());

That’s it. Now you can write as many test as you want.

Test Yourself
– write a test to find an item using following REST API GET /posts/1;

it('should return a POST When called with a valid Id', function (){
    //@TODO: write your test
});

Test angular controller using Karma and Jasmine

In my last blog post, I talked about “Test angular service using Karma and Jasmine”. Today I am going to talk about “Test angular controller using Karma and Jasmine”.

Testing Controller

Lets create a controller test file users.js and do as follows:

describe("UserController", function () {
});

Let’s mock our angular module component.users using angular.mock in the following way:

describe("UserController", function () {
    beforeEach(angular.mock.module('component.users'));
});

To identify the controller users.js we need to add the dependency (inject) to our angular.mock.module in the following way: 

beforeEach(inject(function (_controller_){controller = _controller_;
    UsersController =controller('UsersController', {});
}));

Here we two undefined variable $controller and UsersController. Lets defined them: 

beforeEach(inject(function (_controller_){
    varcontroller, UsersController;
    controller = _controller_;

    UsersController = $controller('UsersController', {});
}));

Now lets start our first test case to check whether the controller is defined or not. To do so, follow this:

describe('UsersController', function () {
    var controller, UsersController, userService;
    beforeEach(angular.mock.module('component.users'));

    beforeEach(inject(function (_controller){
        controller = _controller_;

        UsersController = $controller('UsersController', {});
    }));

    it (' should be defined ', function () {
        expect(UsersController).toBeDefined();
    });
});

Now if we run the following command:

# karma start

it will display error with controller file name. To resolve this error lets create our controller file users.js:

(function (){
    'use strict';

    angular.module('component.users', []).controller('UsersController', usersController);
    usersController.$inject = []

    function usersController() {
        var vm = this;
    }

}());

This time, you will see test case passed:

Chrome 56.0.2924 (Mac OS X 10.12.0): Executed 1 of 1 SUCCESS (0.062 secs / 0.083 secs)
TOTAL: 1 SUCCESS

Testing Controller with Service Dependency

Let’s add the dependency user-service.js (that we created in my last blog post) to the controller and write the test for that.

First modify users.spec.js file as follows:

describe('UsersController', function () {
    var controller, UsersController, userService; // add this

    beforeEach(angular.mock.module('component.users'));
    beforeEach(angular.mock.module('component.users.service')); //add this

    beforeEach(inject(function (_controller_, _UserService_) { // add this
        controller = _controller_;
        userService = _UserService_; // add this

        UsersController = $controller('UsersController', {'UserService': userService}); // add this
    }));

    it (' should be defined ', function () {
        expect(UsersController).toBeDefined();
    });
});

Now if you run # karma start you will see an error, like that

Error: [$injector:unpr] Unknown provider: UserServiceProvider <- UserService <- UsersController

To fix this error, modify users.js controller by adding the service dependency:

(function (){
    'use strict';

    angular.module('component.users', []).controller('UsersController', usersController);
    usersController.$inject = ['UserServic1e']

    function usersController(UserService) {
        var vm = this;
    }
}());

This time you not see any more error.
Now lets define a method userService.all() in service and try to access it in controller users.js.

Update the controller test file users.spec.js file:

describe('UsersController', function () {
    var controller, UsersController, userService;

    beforeEach(angular.mock.module('component.users'));
    beforeEach(angular.mock.module('component.users.service'));

    beforeEach(inject(function (_controller_, _UserService_){
        controller = _controller_;
        userService = _UserService_;

        UsersController = $controller('UsersController', {'UserService': userService});
    }));

    it (' should be defined ', function () {
        expect(UsersController).toBeDefined();
    });

    // add this Test Case
    it('should Initlialized with a call to UserService.all()', function (){
        expect(userService.all).toHaveBeenCalled();
    });
});

This time if you run # karma start, you will see an error like that:

screen-shot-2017-10-30-at-3-48-46-pm

To resolve this error we are going to use spyOn method of Jasmine. Click here to know more about spyOn,

describe('UsersController', function () {
    var controller, UsersController, userService;

    beforeEach(angular.mock.module('component.users'));
    beforeEach(angular.mock.module('component.users.service'));

    beforeEach(inject(function (_controller_, _UserService_){
        controller = _controller_;
        userService = _UserService_;

        spyOn(userService, 'all').and.callFake(function (){
            return [{ id: '1', name: 'Masud', role: 'Developer', location: 'CA', twitter: 'masudiiuc' }];
        });

        UsersController = $controller('UsersController', {'UserService': userService});
    }));

    it (' should be defined ', function () {
        expect(UsersController).toBeDefined();
    });

    it('should Initlialized with a call to UserService.all()', function (){
        expect(userService.all).toHaveBeenCalled();
        expect(userService.all()).toEqual(userList);
    });
});

Now if you run # karma start you will see the following error:
screen-shot-2017-10-30-at-3-57-49-pm

Let’s define the method in our user-service.js file:

(function (){
    'use strict';
    angular.module('component.users.service', []).service('UserService', userService);

    function userService() {
        this.all = all;
        function all(){
            return [{ id: '1', name: 'Masud', role: 'Developer', location: 'CA', twitter: 'masudiiuc' }];
        }
    };
}());

Now if you run # karma start you will not see any error. Now add another Test Case like that:


it('should Initlialized with a call to UserService.all()', function (){ expect(userService.all).toHaveBeenCalled(); expect(userService.all()).toEqual( [{ id: '1', name: 'Masud', role: 'Developer', location: 'CA', twitter: 'masudiiuc' }] ); // add this });

That’s it. Now enjoy Testing your angular application.

Help:
Testing AngularJS with Jasmine and Karma
Jasmine SpyOn

Continue……

If you want to explore my playground, follow this github repository: https://github.com/masudiiuc/angular-unit-test

Testing angularjs with Jasmine and Karma

Karma is one of the best Test runner suite and mostly created and used by angularJS team. Jasmine is one of the best Behaviror driven testing framework. Jasmine is also dependency free and doesn’t require a DOM.

Today, I am going to show how to test a angular service/factory using Karma and Jasmine.

Requirements
To start with Testing we need some node package needs to be installed. To install the packages run the following commands
– To install Jasmin: npm install jasmine-core
– To install Karma: npm install karma
– To integrate karman with jesmine: npm install karma-jasmine
– To run karma with chrome browser: npm install karma-chrome-launcher
– Finally, we need Karma Command line tools: npm install karma-cli

Let’s assume you have an existing angularJS application. To initialize Karma in your application, run this command:

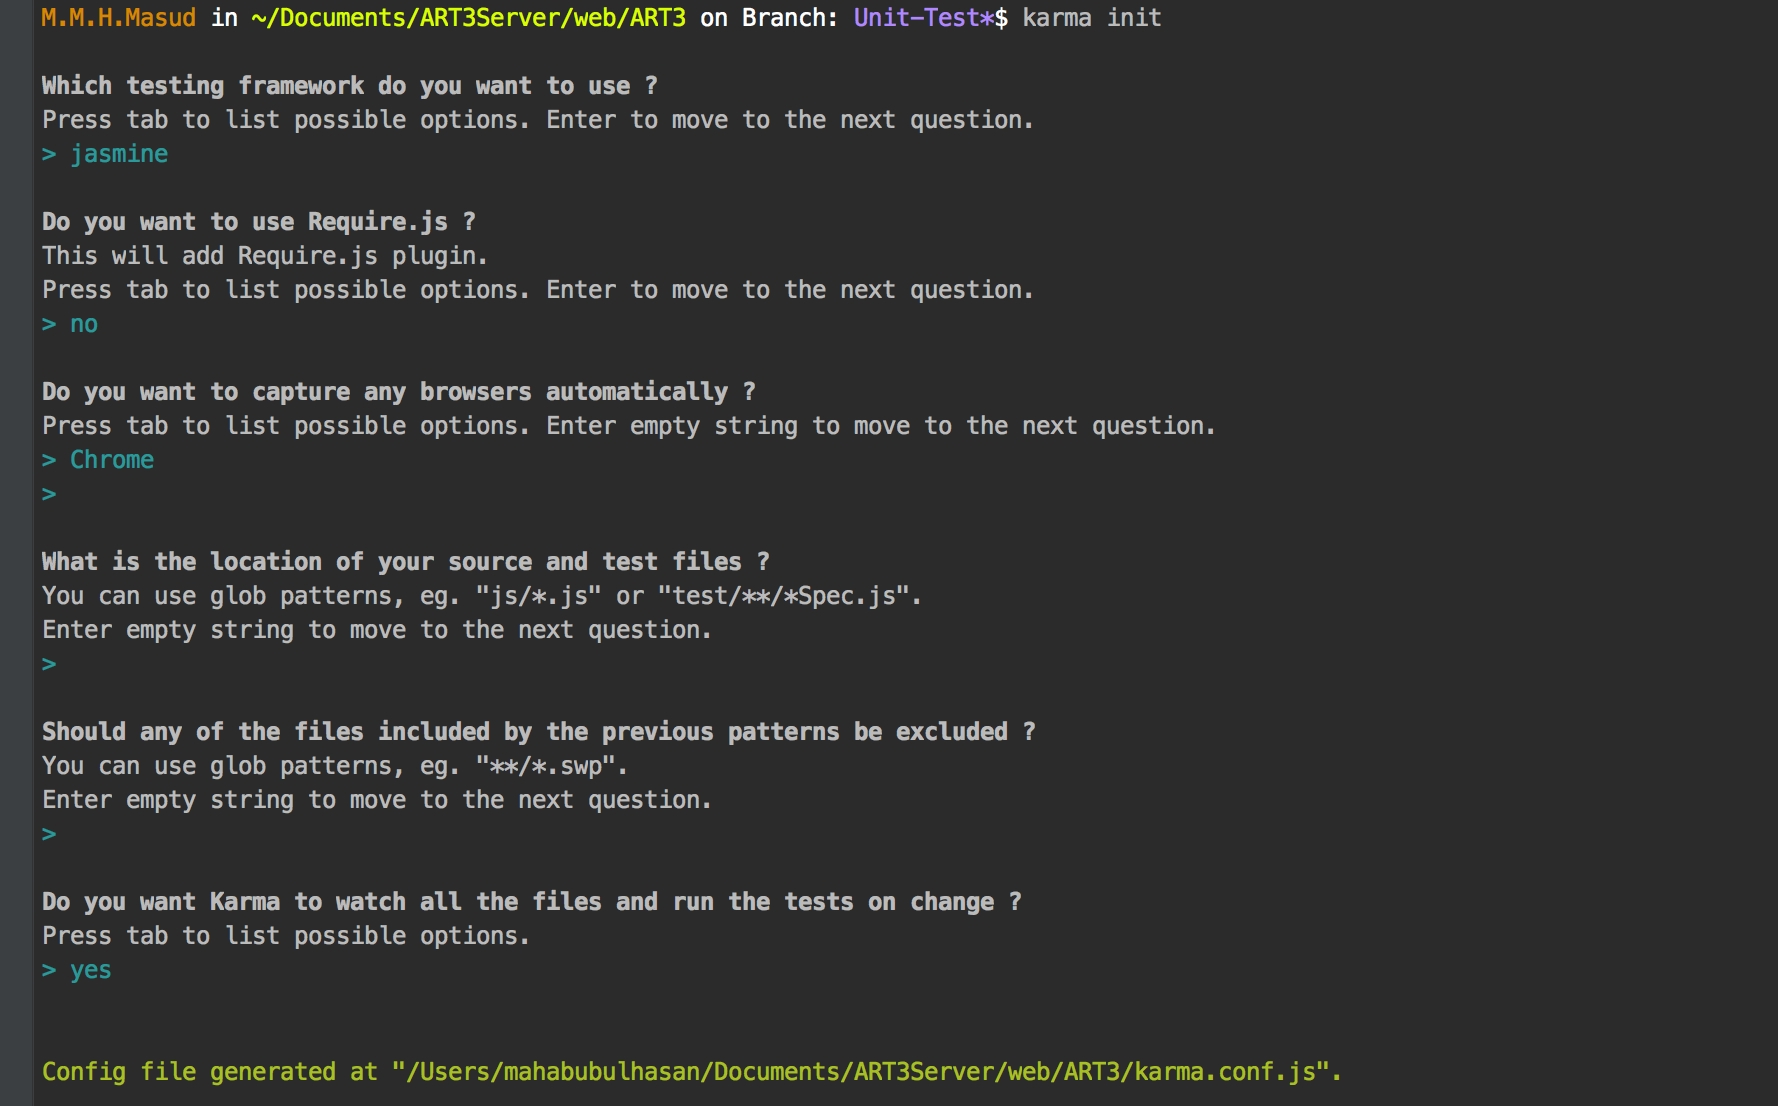
# karma init

which will drive you through some configuration steps like this:
screen-shot-2017-10-27-at-11-55-48-am

This will generate a file called karma.conf.js with some default settings in your root directory. Now open the file in your favorite editor.

module.exports = function(config) {
  config.set({
    basePath: '',
    frameworks: ['jasmine'], 
    files: [
        './node_modules/js/angular.js', // add this 
        './node_modules/js/angular-mocks.js', // add this
    ],
    exclude: [],
    preprocessors: {},
    reporters: ['progress'], 
    port: 9876,
    colors: true,
    logLevel: config.LOG_INFO,
    autoWatch: true,
    browsers: ['Chrome'],
    singleRun: false,
    concurrency: Infinity
  });
}

Now we are ready for test our application with Karma and Jasmine.

Testing angular service/factory

Lets start our first test code with angular service. Assume that we are about to write our first service userService.js. As TDD means Test Driven Development, we should start with our test file called userService.spec.js

Test File: public\test\app\js\service\userService.spec.js

describe('User Service', function () {
    beforeEach(angular.mock.module('api.users'));
    beforeEach(inject(function (_Users_){
        Users = _Users_;
    }));

    it('should exits ', function (){
        expect(Users).toBeDefined();
    });

    it('has a dummy spec to test 2+2', function (){
        expect(2+2).toEqual(4);
    });
});

Now our test file userService.spec.js is ready to execute. To execute the file, we need to include the files in our karma.conf.js file. Do as follows:

files: [
        './node_modules/js/angular.js', 
        './node_modules/js/angular-mocks.js',
        './public/test/app/js/service/userService.spec.js' //add this line
    ],

Now go to the root directory of your project and run the following command:

# karma start

It will through an error like this, as we don’t have the source file with the module name.
Lets create the source file called userService.js.

Source File: public\app\js\service\userService.js

(function() {
    'use strict';
    angular.module('api.users', []).service('Users', function() {
        //@todo
    });
}());

This time if you run the following command karma start you will see something like this:

screen-shot-2017-10-27-at-11-57-03-am

which means, your service has passed the Test Cases. Congrates…

Help:
To the test coverage report in a meaningful way, do the followings:
1. install the following package npm install karma-spec-reporter
2. change in the karma.conf.js file from reporters: ['progress'], to reporters: ['spec'],
3. now run karma start and you will see something like this:

screen-shot-2017-10-27-at-3-53-20-pmContinue…

Create a customizable directive using UI-Select

UI-Select is one of the most popular module for front-end development. it has lots of customizable options, which help to make the UI layer more interactive. So rather than calling the same config thing all the time, why not create a own directive which will accept some params as attribute like field name and config options.

So I create the following directive. here is the way of doing that:

1. Template for the directive, foodropdown.html

2. wirte the directives. fooDropdown.js

3. Syntax of the directive:

4. To test the directive, pass the parameters, in the following way:

Useful NPM Modules for Grunt

Grunt is commonly used as a javascript build tool. Grunt used NPM (node modules) for build purpose. Sometimes it’s very hard to find useful node modules for grunt. Here I will point out some useful node modules that is commonly used with grunt.

This module will clean any directory by removing the whole folders along with the containing files and folders.  The ‘src’ options allow multiple folders with different path.

//clean the build directory
clean: {
    build: {
        src: ['dist']
    }
},
grunt.template.today("yyyy-mm-dd HH-MM-ss-TT") // this will print current date time ex: 2017-01-28 10-10:56 PM
//copy the previous build to
copy: {
    build: {
        cwd: 'dist', 
        src: ['**'],
        dest: 'backup/dist-<%= grunt.template.today("yyyy-mm-dd HH-MM-ss-TT") %>',
        expand: true
    }
},
//rename folders or files
rename: {
    main: {
        files: [
            {
                src: 'backup/dist', 
                dest: 'backup/dist_<%= grunt.template.today("yyyy-mm-dd HH-MM-ss-TT") %>'
            }
        ]
    }
},
//SASS compilar
sass: {
    dist: {
        files: [{
            expand: true,
            cwd: '../css/secondary',
            src: ['**/*.scss'],
            dest: 'dist/sass',
            ext: '.css'
        }]
    }
},
// configure cssmin to minify css files 
cssmin: {
    options: {
        banner: '/*\n <%= pkg.name %> <%= grunt.template.today("yyyy-mm-dd") %> \n*/\n'
    },
    build: {
        files: {
            'dist/css/secondary.min.css': ['../css/secondary/**/*.css','dist/sass/**/*.css']
        }
    }
},
// configure jshint to validate js files 
jshint: {
    options: {
        reporter: require('jshint-stylish'), // use jshint-stylish to make our errors look and read good
        reporterOutput: 'jshint.html'
    },

    // when this task is run, lint the Gruntfile and all js files in src
    build: ['gruntfile.js', '../js/secondary/**/*.js']
},
//compress folders
compress: {
    main: {
        options: {
            archive: 'backup/gmil-<%= grunt.template.today("yyyy-mm-dd HH-MM-ss-TT") %>.zip'
        },
        expand: true,
        cwd: 'dist',
        src: ['**/*'],
        dest: ''
    }
},
// configure to uglify to minify js files based on subfolder.js
uglyfolders: { 
    general: {
        options: {
            src            : '../js/secondary/',
            target         : 'dist/js'
        }
    }
},
// configure uglify to minify js files 
uglify: {
    options: {
        banner: '/*\n <%= pkg.name %> <%= grunt.template.today("yyyy-mm-dd") %> \n*/\n'
    },
    build: {
        files: {
            'dist/js/all.min.js': ['../js/secondary/**/*.js']
        }
    }
},

Finally this is how the package.json file looks like:

{
  "name": "hello-grunt",
  "version": "0.1.0",
  "devDependencies": {
    "grunt": "^1.0.1",
    "grunt-build-number": "^1.0.0",
    "grunt-contrib-cssmin": "latest",
    "grunt-contrib-jshint": "latest",
    "grunt-contrib-less": "latest",
    "grunt-contrib-uglify": "latest",
    "grunt-contrib-watch": "latest",
    "grunt-include-source": "^1.0.0",
    "grunt-ugly-folders": "^0.1.6",
    "jshint-stylish": "latest"
  },
  "main": "gruntfile.js",
  "scripts": {
    "test": "echo \"Error: no test specified\" && exit 1"
  },
  "author": "",
  "license": "ISC",
  "buildnum": "1"
}

This is how the gruntfile.js file will looks like with all this configuration:

module.exports = function (grunt) {

    grunt.initConfig({
        pkg: grunt.file.readJSON('package.json'),

        // configure jshint to validate js files 
        jshint: {
            options: {
                reporter: require('jshint-stylish'), // use jshint-stylish to make our errors look and read good
                reporterOutput: 'jshint.html'
            },

            // when this task is run, lint the Gruntfile and all js files in src
            build: ['gruntfile.js', '../js/secondary/**/*.js']
        },

        // configure uglify to minify js files 
        uglify: {
            options: {
                banner: '/*\n <%= pkg.name %> <%= grunt.template.today("yyyy-mm-dd") %> \n*/\n'
            },
            build: {
                files: {
                    'dist/js/all.min.js': ['../js/secondary/**/*.js']
                }
            }
        }, 

        // configure to uglify to minify js files based on subfolder.js
        uglyfolders: { 
            general: {
                options: {
                    src            : '../js/secondary/',
                    target         : 'dist/js'
                }
            }
        },

        // configure cssmin to minify css files ------------------------------------
        cssmin: {
            options: {
                banner: '/*\n <%= pkg.name %> <%= grunt.template.today("yyyy-mm-dd") %> \n*/\n'
            },
            build: {
                files: {
                    'dist/css/secondary.min.css': '../css/secondary/**/*.css'
                }
            }
        },

        // include source to common.jsp
        includeSource: {
            options: {
                basePath: '',
                baseUrl: '',
                templates: {
                    jsp: {
                        js: '<script src="{filePath}"></script>',
                        css: '<link rel="stylesheet" type="text/css" href="{filePath}" />'
                    }
                }
            },

            myTarget: {
                files: {
                    'dist/common.html' : 'index.tpl.html'
                }
            }
        },

        // build number
        buildnumber: {
            options: {
                field: 'buildnum',
            },
            files: ['package.json', 'bower.json']
        }
    });


    grunt.loadNpmTasks('grunt-contrib-jshint');
    grunt.loadNpmTasks('grunt-contrib-uglify');
    grunt.loadNpmTasks('grunt-contrib-less');
    grunt.loadNpmTasks('grunt-contrib-cssmin');
    grunt.loadNpmTasks('grunt-contrib-watch');
    grunt.loadNpmTasks('grunt-ugly-folders');
    grunt.loadNpmTasks('grunt-include-source');
    grunt.loadNpmTasks('grunt-build-number');


     // this default task will go through all configuration (dev and production) in each task 
    grunt.registerTask('default', []);

    // this task will only run the dev configuration 
    grunt.registerTask('dev', ['uglyfolders','cssmin', 'includeSource', 'buildnumber']);

    // only run production configuration 
    grunt.registerTask('production', ['uglify', 'cssmin', 'includeSource', 'buildnumber']);


};


NEXT: How to use this modules with GULP, Yarn and WebPack


Install CasperJS in windows 7

Following things/steps help me to install and run casperjs on my windows machine properly:

Requirements:

Node Package Manager
PhantomJS

step 01: Install node package manager by following this simple 4 min video

step 02: Install phantomJS using the following command

npm install phantomjs2

Check this link for more details.

step 03: Run the following command 

npm install casperjs

To get the phantomjs and casperjs module in command line, add this to windows bin path. To edit the bin path follow this:

  1. Right click on my computer and click on `Properties`
  2. go to `advanced system settings`
  3. click `Enviroment variables`
  4. from system variables section, select `path` and click on `Edit`
  5. now add caseperjs and phantomjs path like this at the end of path variable:
;C:\WINDOWS_GLOBAL_NODE_MODULES_PATH\casperjs\bin;C:\WINDOWS_GLOBAL_NODE_MODULES_PATH\phantomjs\bin

where `WINDOWS_GLOBAL_NODE_MODULES_PATH` = Your machine node modules path.
6. To get this path run

npm list -g

First line of the command output is the path.

Now you are all set and check the casperjs command in command line.

1-casper

Note: NPM is the best tool for javascript based development. so once you set it up, every new thing is easy to setup.


Some useful articles for nodeJS, Express, Angular and MongoDb

I was reading some blog post over the last weekend and found some good article on NodeJS, Express, Angular (not angular2) and MongoDB. I think it could be helpful for others:

All this articles are published on http://adrianmejia.com/ site.

Simple Todo List with AngularJS > 1.3

Lets create a simple Todo list using AngularJS > 1.3. Nothing to say, the codes tells a lot. Lets write the code:

Step 01: Create a JS file called app.js and put the following code:

'use strict';

var todoAppliction = angular.module("todoApp",[]);

todoAppliction.controller("todoController", todoController);
todoController.inject =['scope'];

/**
 * Processs an input box enter event
 * Ex: on enter add the task in the list
 */
todoAppliction.directive('ngEnter', function() {
    return function(scope, element, attrs) {
        element.bind("keydown keypress", function(event) {
            if(event.which === 13) {
                scope.apply(function(){
                    scope.eval(attrs.ngEnter, {'event': event});
                });

                event.preventDefault();
            }
        });
    };
});


/**
 * Manage todolist functionality
 */
function todoController(scope){scope.todoList = [];
    scope.isValid = true;scope.totalCompleted = 0;
    scope.totalInCompleted = 0;scope.filterBy = 'all';
    
    
    scope.addTodoItem = addTodoItem;scope.removeTodoItem = removeTodoItem;
    scope.getStatus =  getStatus;
    
    
    function addTodoItem(){scope.isValid = isValid();
        if(!scope.isValid) {
            return false;
        }scope.todoList.push({
        	id: 'id_' + (new Date()).getTime(),
            name: scope.task_title, 
            completed: false, 
            createdDate: (new Date())
        });scope.task_title = '';
    }
    
    function removeTodoItem(index) {
    	scope.todoList.splice(index,1);
    }
    
    function isValid() {
    	return (scope.task_title != null && scope.task_title != undefined &&scope.task_title != "")
    }
    
    function getStatus(isComplete){
        var count = 0;
    	angular.forEach($scope.todoList, function(item){
			if (isComplete && item.completed) {
                count++;
            }else if (!isComplete && !item.completed) {
                count++;
            }
        })
        return count;
    }

}

Step 02: Create the template index.html and put the following code inside it:

<body>
    <div ng-app="todoApp" ng-controller="todoController">
        <div class="task-input">
            <input type="text" ng-enter="addTodoItem()" id="task-input-box" placeholder="enter task title" ng-model="task_title"/>
            <button type="button" name="add-task" id="add-task" class="button" ng-click="addTodoItem()">
                + Add 
            </button>
            <br/>
            <div class="error-mg" ng-show="!isValid">Please enter a title</div>
            
            <div id="filterOptions">

                <input type='radio' ng-model="filterBy" value="all"/> All ({{todoList.length}})
                    <input type='radio' ng-model="filterBy" value="complete"/> Complete ({{getStatus(true)}})
                        <input type='radio' ng-model="filterBy" value="incomplete"/> Incomplete ({{getStatus(false)}})
                    
            </div>
        </div>


        <div class="todo-list">
            <ul>
                <li ng-repeat="todo in todoList track by todo.id"
                    ng-show="(filterBy=='all') || (filterBy=='incomplete' && !todo.completed) || (filterBy=='complete' && todo.completed)"
                > 
                    <input type="checkbox" ng-model="todo.completed"/>
                    <span ng-class="todo.completed ? 'complete': 'incomplete'">{{todo.name}} </span>
                    <a href="#" ng-click="removeTodoItem($index)">remove</a>
                </li>
            </ul>
        </div> 
    
    </div>
</body>

Step 03: Style it with CSS in style.css

.task-input{
    padding: 10px;
    background-color: #4072B4;
    color:white;
    font-family:verdana;
    font-size: 12px;
}

.task-input input[type=text]{
    border: 1px solid white;
    padding: 10px;
    font-size: 15px;
    border-radius: 3px;
    width: 280px;
}

.button{
    padding: 11px 15px;
    font-size: 13px;
    border-radius: 3px;
    border: 1px solid white;
    background-color: #3267C6;
    color:white;
}

.error-mg{
    color:red;
    font-size:12px;
    text-align:left;
}

.complete{
    text-decoration:line-through;
    color:#999;
}

.todo-list{
    margin: 15px 0px;
}

.todo-list ul{
    padding:0;
    margin:0;
}

.todo-list ul li{
    list-style:none;
    padding: 0;
}

.todo-list ul li span{
    width: 320px;
    display:inline-block;
    vertical-align:top;
}

#filterOptions{
    margin: 10px 0px;
}

That’s it. Enjoy and play with Todo list

Next: we will store the list in MongoDB and Categories Todo Item.

REST service authentication using jsonwebtoken

In my last tutorial, we have gone through REST service creation using nodeJS and MongoDB. In this tutorial we will show, how to make token based authentication using jsonwebtokenwe will use mongodb for user login information.

Lets install the jsonwebtoken module using the following command:

npm install jsonwebtoken --save

“–save” option will add this module in package.json for future installation.

Now add this module to the server.js file in the following way:

jwt = require('jsonwebtoken'),

Now lets create a user model  so that we can verify user. Create a user.js file under app/models folder and put the following contents in it:

var mongoose = require('mongoose'), 
    Schema = mongoose.Schema;

var UserSchema = new Schema({
    name : String, 
    password : String, 
    admin : Boolean
})

module.exports = mongoose.model('User', UserSchema);

Now, let’s proceed to the authentication process. Authentication consists of two steps:

  1. Login with Username and password
  2. verify the authentication before each request

To make the authentication we will create a Service called authentication.js under app/service folder and put the following code. FYI, this is modular class which will expose two methods. One for check login and another one for verify login before is each request.

var User = require('../../app/models/user'),
    jwt = require('jsonwebtoken'),
    auth = require('../../app/config/auth');

var authenticate = (function (){
    /**
     * @method checkLogin
     * @description check login with user name and password 
     */
    var checkLogin = function (username, password, response) {
        User.findOne({name : username}, function (err, user) {
            if (!user) {
                response.json({
                    success: false, 
                    message : 'Authentication failed. User not found'
                });
            } else if (user) {
                if (user.password != password) {
                    response.json({
                        success: false, 
                        message : 'Authentication failed. User/Password not found'
                    });
                } else {
                    var token = jwt.sign(user, auth.secret, {
                        expiresIn : 1440 // expires in 24 hours
                    });

                    response.json({
                        success: true,
                        message: 'Authentication Success! Enjoy your token',
                        token : token
                    });
                }
            }
        });
    };

    return {
        checkLogin : checkLogin
    };

}());

module.exports = authenticate;

To verify the login before each request, we need to have a method first. Create the following method inside the authenticate module in the following way:

.......................................................................
/**
     * @method isLoggedin
     * @description check login with user name and password 
     */
    var isLoggedin = function (request, response, next) {
        var token = request.body.token || request.query.token || request.headers['x-access-token'];

        if (request.url === '/authenticate' || request.url === '/setup') { //if try to login, avoid token check
            next();
            return false;
        }
        
        if (token) {
            jwt.verify(token, auth.secret, function (err, decoded) {
                if (err) {
                    response.json({
                        success: false,
                        message : 'Failed to authenticate token'
                    });
                } else {
                    request.decoded = decoded;
                    next();
                }
            });
        } else {
            response.json({
                success: false,
                message : 'No toekn has provided'
            });
        }
    };
.......................................................................

Now expose this method as public in the following way:

.......................................................................
return {
        checkLogin : checkLogin,
        isLoggedin : isLoggedin
    };
.......................................................................

Now we have to update route.js file. We use the following route, which will verify the login, before serving the content to that particular request URL. To do that add the following code in route.js file:

var express = require('express'),
    Bear = require('../../app/models/bear'),
    User = require('../../app/models/user'),
    jwt = require('jsonwebtoken'),
    auth = require('../../app/config/auth'),
    authService = require('../../app/service/authenticate'),
    router = express.Router();

router.use(function(req, res, next){
    console.log('Something is trying to reach at ', req.url);
    authService.isLoggedin(req, res, next);
});

// make the authentication request
router.post('/authenticate', function (req, res) {
    authService.checkLogin(req.body.name, req.body.password, res);
});

//rest of code 
.......................................................................

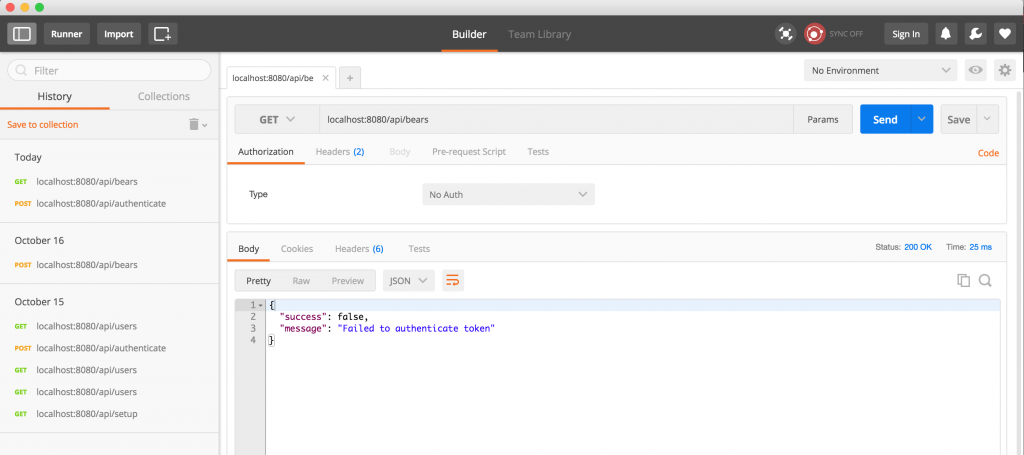
Now try to get list of bear from GET http://www.localhost:8080/api/bears using postman

screen-shot-2016-10-19-at-8-29-57-pm

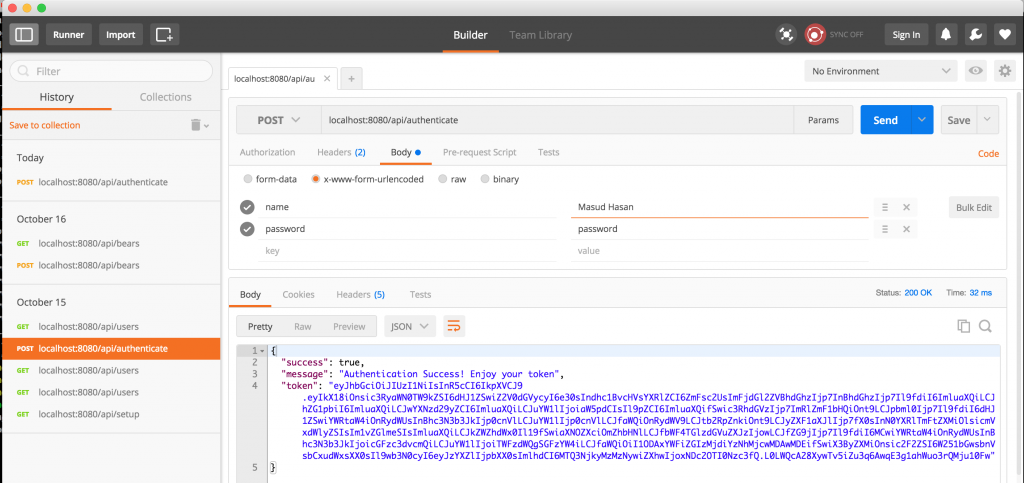
Now it will through an error because authentication token is not available. Now Lets login or authenticate a user and get the token. Check this :

screen-shot-2016-10-19-at-8-29-10-pm

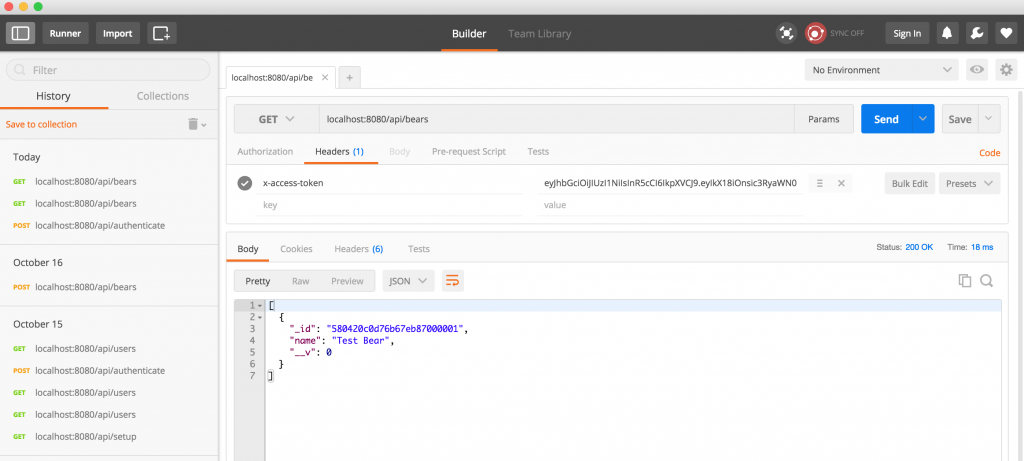
Now copy the token and put it in the GET request header like this way:

screen-shot-2016-10-19-at-8-30-33-pm

Now you will see the list of bear because Authentication token was passed as an header.

Hope you enjoy the process step by step. More will be added soon….


Create Node Server with Express & MongoDB [part-2]

If you miss the previous post, you can check it from here Create Node Server with Express & MongoDB

Step 5: Verify mongodb connection with a new collection (Save & Find)

Lets create a db model file under app/models. Lets called the file name bear.js and put the following content into the file:

var mongoose = require('mongoose'),
    Schema = mongoose.Schema;

var BearSchema = new Schema({
    name : String
});

module.exports = mongoose.model('Bear', BearSchema);

To use this model, we need to include it into the server.js file. But our purpose is to save some data into mongodb server and query the content. For that we need to define some ROUTE. To do that, let’s create a file called route.js under app/config folder and put the following content into the file:

var express = require('express'),
    Bear = require('../../app/models/bear');

/**
 * To insert data on POST method
 */
router.post('/bears', function (req, res){
    var bear = new Bear();

    bear.name = req.body.name;
    bear.save(function (err){
        if (err) res.send(err);
        res.json({message: 'Successfully created'});
    });
});

/**
 * To get all data on GET method
 */
router.get('/bears', function(req, res) {
    Bear.find(function(err, bears){
        if (err) res.send(err);
        res.json(bears);
    });
});


module.exports = router;

Now to access the url, we need to include the route.js file in server.js file in the following way:

.......................................
router = require('./app/config/route'),
.......................................

again, to maintain better REST url, we add a prefix ‘api’ to each route for the app. To do that add the following line:

............................
app.use('/api', router)
............................

Now you can access the url like this:

//To Save data
POST http://localhost:8080/api/bears

//To get all data
GET http://localhost:8080/api/bears

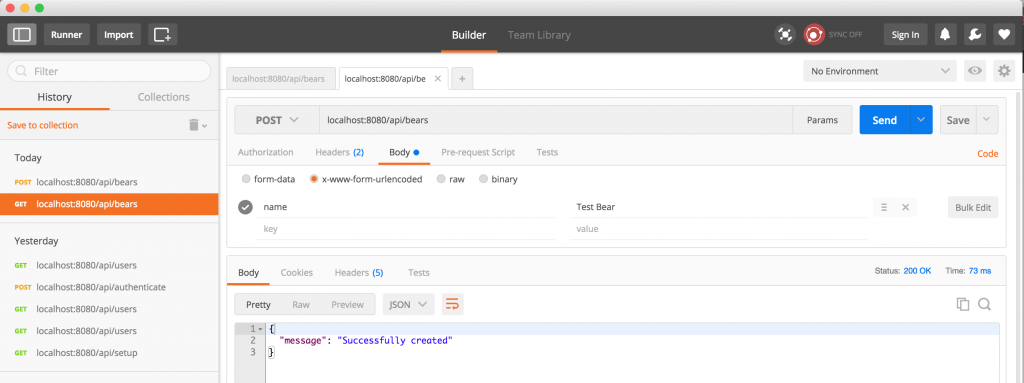
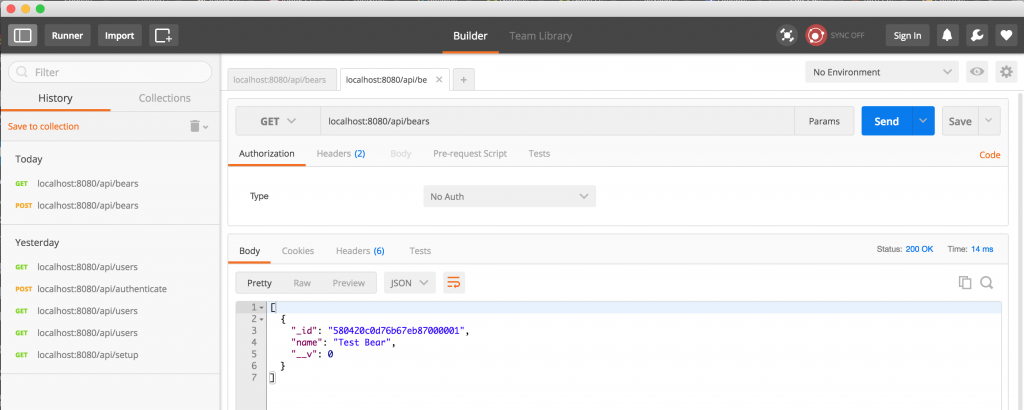
Lets try to access the url using postman chrome extension:

First add a data with POST url:

screen-shot-2016-10-16-at-8-52-22-pm

Now get the data using GET url:

screen-shot-2016-10-16-at-8-52-43-pm